Kelly and I hosted a BBQ for the North Okanagan Radio Amateur Club this past weekend. The club decided to take a break from a full Field Day operation and go with a social BBQ instead. I was happy with the turnout, and the weather behaved as well.
Thanks to all who came by over the 7 hour period.
Monday, June 27, 2016
Sunday, March 22, 2015
Excitement in D-Star Increases with New Compatible Devices
![]() |
| NW Digital Radio DV3000 Add-On Board |
Well part of that excitement might be because of some new USB device announcements.
It looks like the DV Dongle and DVAP Dongle from Internet Labs have some competition
NW Digital Radio has just released their ThumbDV ($119) and DV3000 ($99)
![]() |
| ThumbDV Dongle from NW Digital Radio |
Do you want to play with D-Star on your personal computer or laptop? The ThumbDV would be an excellent choice. Maybe to want to build yourself and D-Star Hotspot with a Raspberry PI, then grab yourself a DV3000 and plug them directly together for another solution.
An open platform radio from NW Digital Radio will support USB ports and internal add-on pins so that either of these new products can be plugged into the radio to add additional digital mode support.
Here's some specs on both products:
• The new DVSI AMBE3000 Chip
• USB 2.0 Low Power (<100ma br="">• FTDI FT230XS
• Windows, Linux, OS X support
• UART Packet Interface
• 230.4 kbaud
100ma>
D-STAR Open Source Applications:
• ircddbgateway
• Analog Bridge (DummyRepeater)
• dvtool file converter
• Bi-directional analog to AMBE
• WinDV
• UDRX Support for D-STAR DV,
Check the website for availability
AMBE HW Vocoder For:
• DMR*
• dPMR*
• Yaesu Fusion
• P25 Phase 2
No SW Support for these protocols at this time
The DV3000U adds D-STAR DV capability to your computer or laptop. Allowing you to get on the D-STAR network without a radio. The FTDI USB to serial converter has preinstalled driver support for Windows and Linux. Mac OS X is available from FTDI. The DV3000U is sold as a tested unit with applications software offered by others. The DV3000U provides a Packet UART interface at 230.4 kbaud via the FTDI 230XS. Audio Data is sent as 16 bits pcm at 8kHz sampling rate. The AMBE Vocoder returns a 3600 bps compressed stream with FEC (Forward Error Correction) which is muxed with 1200 bps of ancillary digital data by the D-STAR protocol to produce a 4800 bps D-STAR DV stream. LEDs show Transmit and Receive.
Matrix Solutions & Moencomm have just announced the new Star*DV USB Dongle ($129)
![]() |
| Star*DV by Matrix Solutions and MoenComm |
With the latest AMBE 3000 chip AND a built-in "sound card" codec for speaker/mikes. Not just an AMBE device! This also has a codec and speaker/mike connector. Introductory Price just $129
- D-Star compatible QSOs without a D-Star radio
- Use a PC with internet, plug into the USB port
- Codec and connector for speaker/mike
- Also available now: the new SDV app for Windows, Desktop Linux and the Raspberry Pi
- Works with G4KLX ircDDBGateway to establish links to REF/XRF/DCS reflectors, ircDDB callsign routing or CCS callsign routing.
SDV will optionally work with a GMSK Modem - have QSOs in the shack without a D-Star radio while providing your own Hotspot for outside and mobile access to the D-Star network.
SDV on Windows and Linux Desktop has a great graphical interface -- supports DPRS maps, callsign and user message display, and easy linking and unlinking
SDV on the Pi uses an optional LCD plate with 5 control buttons for linking and configuration -- you can run the Pi headless if you want and still see callsigns, do linking
- Available in White or Black
- Order the USB cable in your choice of different lengths and colors (does not come with Star*DV)
- Inexpensive speaker/mikes available
- LCDs for the PI (built, not a kit), monochrome and not expensive - coming soon
Friday, February 06, 2015
Remote Access & Monitoring of a FreeStar Hotspot
Now that I've setup a couple D-Star compatible hotspots I've got some additional tips and tricks to share if anyones interested.
Both of the hotspots I was involved with are running the FreeStar* software http://www.va3uv.com/freestar.htm.
FreeStar runs on Debian linux, which can operate on various computer platforms. Personally I've been using BeagleBone Black's, but you also can use a Raspberry Pi, both are micro singleboard computers designed for hobbyists, projects, etc. Priced at around $50 each, these are affordable, and much much smaller then dedicating an old PC to the job.
Once your FreeStar hotspot is up and running you're probably already using two seperate tools to manage it.
- Change the default password in your Debian operating system. The 'root' account is the most powerful account in the Linux OS, securing it with a very very good password is a MUST. Be smart, use letters, numbers, special characters, capitals, lowercase, etc. The longer the password, the more secure.
- Setup your hotspot on a internal static IP address within your network.
- Change your SSH service to run on a non-standard port (the default is 22) for example use 222 or 220.
- Setup port forwarding rules in your router. All these rules should reference the static IP that you've assigned to your hotspot.
With these steps completed you should now be able to reach your hotspot dashboard & SSH from the internet. To test it use a website like WhatIsMyIP.com to find out what your external (internet) IP address is. Use that IP instead of the internal one to try and view the dashboard page
Examples
Most D-Star hot spots will be setup in people homes / shacks. Your internet connection is provided by a local ISP and your external dynamic IP address will be automatically changed on some schedule. Becasue of these random changes to your outside IP address you may loose access to your hotspot from the outside if you don't have some way of knowing when these address changes occur.
DDNS services like DynDNS.com work by letting you pick out a custom domain name from a selection of options. You'll then run a small app on one of the desktop computers within your home to routinely check what your outside IP address is, and relay any changes back to the DDNS servers.
The DDNS update software doesn't have to run on your hotspot, any computer within the same home network that's turned on all the time (or almost all the time) will do. If you're comfortable with the Linux OS you can run a DDNS daemon on your hotspot, but I'll let you figure that out on your own. Personally I have a Windows system on 24/7 so I just run the updater in the background on that machine.
DDNS services are available for free from companies like
I mentioned DynDNS earlier specifically because one of their registered domains is...
So in summary, with a DDNS service setup you'll never need to know what your current external IP address is, even if it changes. You'll also be able to use a custom domain name (like other internet websites) instead of knowing the IP address. With the new domain being a constant you can bookmark your dashboard in your favorite browser, and create a saved profile in PuTTY for SSH.
You can now install an SSH client on another PC/laptop and control the hotspot from the road, work, or while on vacation.
Personally I've been playing around with doing all of this from my smartphone as well.
On Android I installed the JuiceSSH app (free) and now I have an SSH client on the phone.
I added the JuiceSSH Performance Monitor plugin (free) and I can monitor the hotspot from anywhere.
73
Aaren - VA7AEJ
Both of the hotspots I was involved with are running the FreeStar* software http://www.va3uv.com/freestar.htm.
FreeStar runs on Debian linux, which can operate on various computer platforms. Personally I've been using BeagleBone Black's, but you also can use a Raspberry Pi, both are micro singleboard computers designed for hobbyists, projects, etc. Priced at around $50 each, these are affordable, and much much smaller then dedicating an old PC to the job.
Once your FreeStar hotspot is up and running you're probably already using two seperate tools to manage it.
- The dashboard webpage generated by FreeStar from your browser.
- An SSH client like PuTTY for a remote command line interface into the Debian OS
Access from the outside.
If you've followed VA3UV Ramesh's excellant install guides for FreeStar you've already completed some/all of these mandatory first steps. If not, go back and do it, these are essential requirements.- Change the default password in your Debian operating system. The 'root' account is the most powerful account in the Linux OS, securing it with a very very good password is a MUST. Be smart, use letters, numbers, special characters, capitals, lowercase, etc. The longer the password, the more secure.
- Setup your hotspot on a internal static IP address within your network.
- Change your SSH service to run on a non-standard port (the default is 22) for example use 222 or 220.
- Setup port forwarding rules in your router. All these rules should reference the static IP that you've assigned to your hotspot.
TCP 5088 for the web dashboard
TCP xxx for SSH (insert your unique non-default SSH port)
UDP 20001
TCP xxx for SSH (insert your unique non-default SSH port)
UDP 20001
UDP 30001
UDP 4000
UDP 4000
Examples
- LAN URL - http://192.168.1.10:5088
- Internet URL - http://96.50.241.59:5088
Dynamic DNS
(DDNS) is a service where your external (internet) IP address is resolved into a simpler to use domain name like ve7hsp.ham-radio-op.net.Most D-Star hot spots will be setup in people homes / shacks. Your internet connection is provided by a local ISP and your external dynamic IP address will be automatically changed on some schedule. Becasue of these random changes to your outside IP address you may loose access to your hotspot from the outside if you don't have some way of knowing when these address changes occur.
DDNS services like DynDNS.com work by letting you pick out a custom domain name from a selection of options. You'll then run a small app on one of the desktop computers within your home to routinely check what your outside IP address is, and relay any changes back to the DDNS servers.
The DDNS update software doesn't have to run on your hotspot, any computer within the same home network that's turned on all the time (or almost all the time) will do. If you're comfortable with the Linux OS you can run a DDNS daemon on your hotspot, but I'll let you figure that out on your own. Personally I have a Windows system on 24/7 so I just run the updater in the background on that machine.
DDNS services are available for free from companies like
I mentioned DynDNS earlier specifically because one of their registered domains is...
ham-radio-op.net
Even though they are a paid service, I thought it was cool to able to register the domain
(mycallsign).ham-radio-op.net
That's really easy to remember.So in summary, with a DDNS service setup you'll never need to know what your current external IP address is, even if it changes. You'll also be able to use a custom domain name (like other internet websites) instead of knowing the IP address. With the new domain being a constant you can bookmark your dashboard in your favorite browser, and create a saved profile in PuTTY for SSH.
Remote Monitoring
So, if you've been following the steps so far...- Your SSH is secured with a non-standard port and strong password
- Your internet router has all the open ports required to the outside (the internet)
- You've setup a Dynamic DNS service so you don't need to know your external IP address, and you have a handy to remember domain name to use instead.
You can now install an SSH client on another PC/laptop and control the hotspot from the road, work, or while on vacation.
Personally I've been playing around with doing all of this from my smartphone as well.
On Android I installed the JuiceSSH app (free) and now I have an SSH client on the phone.
I added the JuiceSSH Performance Monitor plugin (free) and I can monitor the hotspot from anywhere.
73
Aaren - VA7AEJ
Friday, November 07, 2014
VE7HSP - A New Callsign for my Free Star* Hotspot
Continuing my learning curve of open source D-Star hot spots and repeaters I have registered a new callsign with Industry Canada and assigned it to my Free Star* simplex hotspot. I chose the new callsign as a play on the word HotSPot.
VE7HSP
For the record, personal / private simplex hotspots are typically assigned the amateur operators primary callsign. This means that your radio and your hotspot all use the same callsign, so I'm kind of bucking the trend with this configuration. I have a motivation though because I'm also working on a Free Star* full duplex repeater for the local club and I wanted to understand all the nuances of hotspots vs. repeaters vs. gateways, etc under this world of D-Star technology. It all seemed a necessary learning curve of reading, trying, researching, asking questions of others, and experimentation.
On a side note I listened in on the PAPA D-Star round table tech net last night and learned a few new things as well.
D-STAR Round Table: (Weekly Net)
Date: Every Thursday
Time: 8:00 PM
Frequency: REFLECTOR 12A & most PAPA D-STAR repeaters.
Comments: Technical net for D-STAR fans. Topics change weekly and questions are welcome.
Wednesday, October 15, 2014
D-Star Radios, Dongles, and a Homemade HotSpot
![]() |
| VA7AEJ's D-Star HotSpot operating on simplex UHF. Built from a DVRPTR modem, BeagleBoneBlack micro PC, FreeStar on Debian Linux, and an analog Kenwood radio with a 9600 baud data port. |
I started to experiment with D-Star this past summer, it actually started with the purchase of a new truck.
In the spring of this year I purchased a used truck to replace my old 88' Sierra crew-cab that ran like a tank, but looked like a shipwreck. After I received the newer truck (2001) I started to have grand plans about radios, antennas, and all the possibilities.
After my birthday in July I took my gift cash and started shopping for a new mobile radio, D-Star enabled radios seemed to be wise investment since I was getting a fully functional analog FM radio (single or dual band), plus it would also be D-Star DV enabled on the same bands. More modes / more versatility
![]() |
| Icom ID-880H Dual Band D-Star Radio |
Evolution #1 - My First D-Star Radio
So after some shopping and stretching of the budget, I bought an Icom ID-880H. This is an analog FM dualband (VHF/UHF) radio that is also fully functional on D-Star's digital voice mode as well.
I had purchased another Icom mobile previously for my QTH base station (IC-2300H), and I really liked the brand and the radio. I also had purchased a programming cable and software package from RT Systems for the first radio. Coincidentally, the programming cable was compatible with the new radio, so all I needed was just the model specific software for the new radio and now I have PC programming capabilities for both plus I saved a bit of money.
Throughout the summer I installed and enjoyed the new radio, but I don't have a D-Star repeater in my immediate vicinity. So my only opportunities to try D-Star came when travelling in the truck over longer distances to repeaters in other cities.
Before I get any further I should mention the following to all D-Star newbies.
- D-Star is a digital mode for licensed Amateur Radio Operators. You can't use D-Star without a license.
- D-Star requires registration of your amateur radio callsign to work. All D-Star repeaters and reflectors are linked over the Internet so once you've registered on your nearest repeater, you're ready to talk worldwide soon afterwards.
- Registration can take as little as a few hours to process, or it can take days. I suggest that you research D-Star Registration as one of your earliest steps in deciding to try out D-Star, especially get it started before you buy a radio.
Evolution #2 - An Even Cheaper Method Of Using D-Star
So even though I had caught the D-Star bug, I wasn't able to use it as often as I wanted. So with that in mind my second investment was in a DV Dongle from Internet Labs.
![]() |
| DVDongle - D-Star via USB on your PC |
The DV Dongle is currently the entry point for D-Star. At $200 it's not even a radio, it's simply all the core electronics and digital decoder required to talk on D-Star over the Internet.
Because the D-Star systems are connected worldwide via the internet, the DV Dongle and your home PC or laptop can also make a D-Star connection over the Internet without the need of a radio. The only downside is that you are tethered to the Internet as your connection point.
Using a DV Dongle works as follows.
- Register your callsign (one registration per callsign is all you'll ever need to do) before starting any D-Star activity
- Plug the DV Dongle into your PC via USB
- If required, add the appropriate driver software for your host operating system.
- Install the DV Tool software OR the DutchStar WinDV software. Really you should try them both to compare the features and user experience. I personally have both installed and still flip back and forth.
- Connect a microphone and headphones, or a headset with a mic into your PC. Please don't make others have to endure the echo nightmares of an open mic and speakers.
- Configure the software you have installed to use the correct com port of the dongle, your D-Star registered callsign, and the audio inputs and outputs to match your mic and headphones. These are the bare minimum things you'll need to configure, there is lots of other stuff to figure out later.
- Connect the software to the dongle
- Input a D-Star repeater or reflector and make a connection.
- Click your mouse on the PTT button and start your first QSO.
There are plenty of more detailed and better produce instructions and videos on this entire process online. Please Google them and work through it step by step.
Evolution #3 - My Own D-Star HotSpot
So far I can use the DV Dongle on D-Star while sitting at my home PC.
And I can connect to D-Star while driving in the truck as long as I'm near repeaters in other neighboring cities and provinces.
But what about around my hometown, that's where I would get the most use out of any D-Star radio. Working in the yard, the shop, driving around my QTH, etc.
So while researching all the D-Star related gear and technology I kept hearing about HotSpot's, and that led me to the latest project.
To define a D-Star HotSpot, maybe I should start with a comparison...
At home, you likely have wireless internet. The wireless service is delivered to all your devices (computers, phones and tablets) via a wireless router or access point. These devices provide a bridge between your wireless devices, and the high speed wired internet delivered to your home. The output power of your wireless access point or router is not very strong, but it's strong enough to provide wifi to the area around your home. You may have also heard the term "HotSpot" used by businesses or restaurants when referring to free wifi connections at that location.
So let's say you have a D-Star radio, and no local D-Star repeater. Or, maybe there is a local repeater, but it's busy, and you would like to control the linking and unlinking of the repeater at your whim, but that would upset the others using it.
A D-Star HotSpot, is essentially your own private micro/mini repeater. It operates at low power (10 mW to 5 W), and has a range from maybe 50 meters to 5 kilometers (depending on structures, terrain, line of sight, etc).
Internet Labs, the company that makes the DV Dongle has a second product called a DVAP Dongle. This is a 10 mW hotspot USB device available in VHF or UHF models. When connected to your home PC, and running the software, you can now move freely around the house talking on D-Star from a handheld. This is the lowest power version of a hotspot, but it works well if you don't have far to travel.
A more powerful and DIY solution to a Hotspot is one that you build yourself from the following ingredients.
- An analog VHF or UHF amateur radio with a 9600 baud data port built in. Commonly people are using mobile radios that offer this feature set.
- A GMSK modem. Popular models include DVRPTR, MoenComm Star*Board, and Dutch*Star DM-1
- A computer (big or small, more details to follow)
- Hotspot software like FreeStar from Canada, or DutchStar from the Netherlands.
- A suitable VHF or UHF antenna.
- A suitable 12v DC power supply.
In my case I went with a Kenwood TM-V7A dualband mobile radio that I purchased used a couple years ago. It had a 9600 baud data port and was sitting on a shelf just waiting for this project to come along.
For a modem, I ordered a DVRPTR v1 from http://www.dvrptr.net/ This is an open source design assembled, tested and shipped worldwide from Montreal, Canada. $130
For a computer, I opted for a BeagleBoneBlack a low-cost, community-supported development platform for developers and hobbyists. Fitting inside of an Altoids tin, this tiny PC can boot Linux from a MicroSD card in under 10 seconds and is great for projects like this.
For software I went with the FreeStar software (another Canadian product) from VA3UV http://www.va3uv.com/freestar.htm. FREE STAR* is an experimental approach to the implementation of a vendor neutral, open source, digital communication network. Ramesh is a fantastic resource for support and an incredible evangelist for this product. I probably bounced 10 emails to him over the course of a week or two, and answered every one in a timely fashion with great advice. FreeStar can be configured to run as a full DV repeater, or a hotspot in either full duplex or simplex operation.
For an antenna, I already had a Comet dual band vertical on my tower and with a Comet triplexer I was able to connect the HotSpot to the UHF band of the antenna. The best part of this solution is that my VHF radio in the shack is also operating on the same antenna's VHF band thanks to the triplexer.
So after a week of building, testing and enjoying, I now have a 5w hot spot operational out of my QTH. I think I'm the only 'ham' in town playing with D-Star or even UHF, so the band is very quiet in my immediate area. I'm also located at the bottom of a small mountain valley area, so there are large hills on all sides keeping my signal from spreading too far in any direction causing interference with others. In the direction of the highway I commute on, I'm getting about 5km of range with good clean DV audio, I have linked and unlinked reflectors from as far away as 10km, but the audio is loaded with 'R2DR' noise till I'm at least 7km from home. I attribute the great reception to the great antenna up 40 feet on the tower outside of my home. Earlier tests with another antenna about 15ft off the ground had about half the range at the same power level.
I made my first contact with the hot spot on a Friday evening Canada wide net on the XRF005B reflector in Ontario. This week I've had multiple QSO's while driving to and from work with British, Irish, and American amateur radio operators on the REF001C 'mega' reflector.
D-Star is yet another Amateur Radio technology that combines radio communication and computing in new and exciting ways. I'm really enjoying it.
Tuesday, February 04, 2014
RTL-SDR - The NooElec 'Ham It Up' Upconverter v1.2 and a 3D Printed Enclosure
The 125MHz upconverter for the RTL-SDR arrived last night in the mail.
Darn it! I'm missing an adpater to start using it right away. Once again I'm faced with the hardware arriving before the adapters and cables do.
The 'Ham It Up' Upconverter from NooElec version 1.2 will essentially add 125MHz to all the incoming signals allowing me to receive HF signals through the RTL-SDR. No longer limited to the lower range of 25MHz, I'll be able to scan all the HF bands from 160m to 10m.
The upconverter at $45 is more expensive then the sub-$20 RTL-SDR's but for a Ham Radio guy the HF bands are a key receiving range so it's worth the money. All said and done I'm still putting together a SDR Receiver kit for well under $100 that I can carry around in my pocket.
Since I couldn't use the upconverter right away due to my cabling issue, I used the time last night to surf around the internet and stumbled upon a shared 3D model for an enclosure designed exclusively for the Ham It Up. http://www.thingiverse.com/thing:150101/#files Thanks Tim Deagan - KC5QFG.
I brought the 3D model files into the office and during some spare time today we cranked off a copy on our MakerBot.
I'm really pleased with the outcome and I'm totally geeking out over the last few weeks, QRP Radios, SDR, Kits, 3D Printing, YIPEE! Once again it's time slow down and start USING instead of just BUILDING.
Thursday, January 30, 2014
The QRP Diaries #4 - AGC for the X1M
Anyone thinking of purchasing an X1M QRP radio needs to join the YahooGroup. This is by far the most active YahooGroup / email reflector that I've ever been a member of.
The group started in March of 2013, and less than 1 year later there are 750 members, and 500-700 messages per month of activity.
AGC for the X1M
Dale Parfitt , W4OP was an early adopter of the X1M radio and took it upon himself to remedy the radios lack of automatic gain control. For the newbies, that is the radio feature that tries to balance the volume levels of different signals. In Amateur radio imagine two guys talking on the same frequency. One is operating at 100 watts and the other at 1000 watts. Your roughly in the middle and listening to both. This experience is like standing between two people talking to each other, one is whispering, and the other is yelling.
From Wikipedia...Automatic gain control (AGC) is a technique found in many electronic devices. The average or peak output signal level is used to adjust the gain to a suitable level, enabling the circuit to work satisfactorily with a greater range of input signal levels. For example, without AGC the sound emitted from an AM radio receiver would vary to an extreme extent from a weak to a strong signal; the AGC effectively reduces the volume if the signal is strong and raises it when it is weaker.
The AGC SMD kit for the X1M was originally created by Dale and was designed to be extremely small and fit inside of the X1M , Dale designed and sold the kit in it's first iteration, and then moved onto working on a crystal CW filter KIT, also intended to be an internal board upgrade for the X1M.
Charlie , W5COV then picked up the reigns of the AGC kit and starting in Dec of 2013 was taking orders for it online. For this $12 little kit he used the same boards and parts as what Dale included in his kit. You can check it out in the Photos and Files section of the YahooGroup for more information.
I personally ordered the AGC kit before my X1M had even landed on my door step. Conversations on the YahooGroup gave me enough of a warning that is was a 'must have' mod if you could do it.
Earlier this week a tiny little package arrived in the mail, at first I wasn't sure what it was. When I opened it up, I was a little surprised at the size. A tiny circuit board the size of a nickel, and some small components. At closer inspection most of these parts were the size of a sesame seed, they had some plastic packaging around them since they were cut right off a reel of SMD parts.
I work for an electronics manufacturer, we have our own SMT line so I'm familiar with the tiny parts that the pick and place robots pull off the reels and place on the boards. In our line we move the circuit boards through in this order.
- A screen printer puts the solder paste on the pads throughout the circuit board. All the tiny pads get solder, the rest of the board is left clean. When completed a conveyor moves the board to the next machine.
- The next SMT machine places all the small SMD parts on the pads. This machine has lots of reels of parts. The multiple hands, and fingers in the machine (those are my terms, not official SMT speak) can place about 100,000 parts per hour. When completed a conveyor moves the board to the next machine.
- The next pick and place machine has less reels, but specializes in larger parts. The type of products we build require some larger components, it's not all tiny SMD sized parts. When completed a conveyor moves the board to the next machine.
- The final machine is an oven. In our case it's a 4 zone convection oven. A 'recipe' is made for each type of product to bring it up to temperature, just enough to properly melt the solder paste and fix the SMD parts to the circuit board. But not too much to damage the parts large or small. When completed a conveyor moves the board to a quality control station.
- Our SMT staff check the board, inspect the parts, and in some cases use a special cutter to split larger circuit boards into the small ones we would fit into our products. It's more efficient to make larger boards that consist of many smaller ones, that way more product moves through the line with less adjustments to the equipment.
So why all that level of detail?
- I think it's pretty cool and not everybody get's to see how stuff is made.
- To put into perspective the size of the parts that came in this kit.
![]() |
| SMD sized Capacitor - The actual part is smaller than a grain of rice, more like the size of a sesame seed. |
So when I opened the kit and saw the parts I must admit I panicked a little. I built my first thru hole electronics kit only one month ago and I thought that was a size of part at the edge of my eyesight and dexterity.
So for this kit I cheated. I know my soldering skills are C+ or B at their best. But when you work for an electronics manufacturer and your best friend works on the hardware side of R&D, you can cheat and take it to Dave.
So after hours I gave it to Dave and in less than 15 minutes he scanned the diagram, put it under his microscope and soldered it all together, I was reading the instructions and skipping ahead just to keep up with him.
His comment when it was all done "I wish we still used these sized parts in our SMT line, they're so big and easy to work on".
![]() |
| Dave's Work - Nice job Dave! |
![]() |
| AGC Kit wired into the radio and tested. Fixed into place with double sided tape |
Thanks to Dale W4OP for the great design,
and Charlie W5COV for keeping the kit alive.
Friday, January 17, 2014
RTL-SDR Adapters and Pigtail Cables
![]() |
| MCX to BNC pigtail cable (bottom) - BNC to UHF adapter (top) |
Ron is a 'VHF and Up' enthusiast so his expertise is appreciated.
The RTL2382U / R820T USB DVB-T dongle is 24 MHz to 1.850 GHz
So let's look at some common Amateur Radio RF connectors
N type connector
- 0 - 18 GHz
- insertion loss is less than .15dB @ 10GHz
BNC type connector
- 0 – 4 GHz
- insertion loss is .2dB @ 3 GHz
UHF type connector
- 0 - 300 MHz
- insertion loss is 1 dB @ 300MHz
- As you can see it's good for HF but not really suitable for a very very wide portion of the RTL-SDR’s frequency range 300 MHz - 1.85 GHz)
MCX to SMA is also a very common pigtail/adapter combination on these dongles with very acceptable low loss.
So with lots of cool activities on the full range of the RTL-SDR we need connectors and cables with suitable low loss characteristics.
As Ron says... At VHF and up, every dB counts.
So with that in mind I suggest that we increase the variety of pigtail cables that we supply to NORAC members with the RTL-SDR.
As mentioned in the original quote we still provide the MCX to BNC pigtail with the BNC to UHF adapter (picture at top of this post).
But we should all ALSO consider some or all of the following.
![]() |
| MCX to N female |
![]() |
| MCX to N male |
![]() |
| MCX to SMA female |
And since a couple of the NORAC members have already expressed interest in an Upconverter, you will absolutely require the pigtail below to connect the RTL-SDR to the NooElec Upconverter board.
![]() |
| MCX to SMA male - This is a required cable for a RTL-SDR to Upconverter connection. |
The QRP Diaries #3 - The Unboxing and First Impressions
I love it... ha ha
This is a fun little radio and I can see so many possibilities.
When it first arrived I resisted the temptation to rip open the box and decided to film a quick unboxing. I know when I buy something online these days I appreciate and and all videos that exist about the product. for people like me they are helpful.
This is a fun little radio and I can see so many possibilities.
When it first arrived I resisted the temptation to rip open the box and decided to film a quick unboxing. I know when I buy something online these days I appreciate and and all videos that exist about the product. for people like me they are helpful.
Wednesday, January 15, 2014
RTL2832U R820T SDR USB Dongle and SDR# (SDR Sharp) Installation
![]() |
| One of many the RTL2832U/R820T Digital TV USB dongles on the market |
Over the last year + certain models of Digital TV (DVB-T) tuners in the form of a USB dongle have been gaining popularity with hobbyists when it was discovered that this tiny USB stick could be used as a Software Defined Radio receiver with a fairly wide range of frequency and use.
The RTL2382U Chip, this is the ADC and USB data pump. It is then mated with different models
of tuner chips.
- E4000 Tuner - 60MHz to 1700MHz; retired
- FC0012 Tuner - 50MHz to 1000MHz; retired
- FC0013 Tuner - 50MHz to 1700MHz; retired
- R820T Tuner - 24MHz to 1850MHz ; active
The current model is the RTL2832U/R820T, it has just replaced the E4000 which is still available online as well. The RTL2832U/R820T is comparable in performance, wider in receiving range, and less expensive overall.
The frequency range of the RTL2832U/R820T is roughly from 24MHz to 1860MHz.
So this includes 10m, 6m, 2m, 222-band, 440-band, 900-band, 1240-band, and much more. Even lower frequencies (all of ham radio HF) can be received with additional up converter boards available online.
Lots of choices are available.
http://blog.kf7lze.net/2012/09/14/round-up-of-rtlsdr-upconverter-choices/
Most of the USB SDR sticks/dongles include a cheap antenna and use a small MCX antenna jack so adapters are required to connect a better antenna of your choice. With a better external antenna (for example a Discone) the RTL2832U / R820T can be very impressive as a receiver. The basic antenna that it ships with can still be useful for travel or use in cities or areas where signals are already strong.
Once you've ordered and received your RTL2832U/R820T you need to get up and running. I'm going to summarize the steps for a Windows PC or Laptop. Of course there is also software for OSX and Linux, as well as a driver and app for Android.
RTL2832U/R820T Installation for Windows
- Visit the SDR# website (http://sdrsharp.com/) and download the installation Script. Click on Downloads button on the top menu, then scroll down the downloads page and look for the link to the quick installation script to test the latest development version. Download the ZIP file and then unpack it.
- Make sure your computer is connected to the Internet and then launch the Install.bat file that was included in the unpacked zip folder. This will execute the command to create a new folder and download everything you need for the latest version of SDR#.
- A new folder "sdrsharp" now exists in the location where the Install.bat folder was executed. I personally suggest you move the new sdrsharp folder from this location to a more permanent location on your system. The application is ready to run in this folder so you may not want it on your desktop or in your download folder long term. I moved mine to the root of the C: drive before going on to the next steps.
- Insert your RTL-SDR dongle into your USB port on your system. Allow windows to find and install a driver if it can. DO NOT install any of the Digital TV software that may have come with the dongle.
- When that's complete open the sdrsharp folder and execute the program zadig.exe. Go to the Options menu and select List All Devices. From the Devices drop down menu select the device named Bulk-In, Interface (Interface 0). Click on the button Install Driver, allow Windows to install an unsigned driver (if prompted). you'll be prompted that the driver install is complete and you can close Zadig.
- Browse inside the sdrsharp folder and launch the actual SDR software SDRSharp.exe, you may also want to create a shortcut to this program and place it in your Start menu or on your Desktop for more convenience.
- To get started in SDR# you need to complete the following basic setup steps.
- From the top drop down menu (between the Play and Configure buttons) select the RTL-SDR / USB device.
- Click on the Configure button and make sure the Generic RTLxxx OEM is selected. Feel free to leave the sample rate and mode alone for now. Turn on the check box for RTL AGC and drag the slider to the middle. Then turn on the Tuner AGC and click the Close button.
- Go the top left and click on the Play button and your receiving!
Next...
There is a great YouTube video from Clayton Smith (VE3IRR). His video he picks up where my directions end. He walks you thru a lot of the settings in SDR# showing you how they work and also showing example frequencies all over the range of the RTL-SDR so you can get a feel for things in a relatively short period of time. His video is about 17 minutes long.
Getting started with SDR# and an RTL SDR Tuner
Sunday, January 12, 2014
The QRP Diaries #2 - The X1M Platinum - Specs
X1M Pro - The New Platinum Edition
- Improved Display
- Improved Controls
- Improved Components
- Improved Filtering
- Improved Performance
- NOT A KIT - FULLY WIRED & TESTED
Modes: USB & LSB & CW
Power output: 5 Watts (4.5 Watts)
Operating voltage: 12 vdc
Operating current: 0.35 ~ 1.2 amp
Receiver Preamplifier: Yes
Memory Channels: 100
RIT Function: Yes
Automatic Internal CW Keyer: Yes
Backlight On/Off: Yes
Keyboard lock: Yes
Dimensions: 3-13/16 x 1-9/16 x 6-1/8 inches
Weight: 0.65 kg ~ 1.43 lbs
PTT Microphone: Included
Computer Control: Compatible with Ham Radio Deluxe (factory adapter required - Choose Icom IC-718 in HRD)
* Transmits continuous 100 kHz - 30 MHz via Menu option. Preset transmit range is the five US bands shown below.
Five Ham Bands are configured with bandpass filtering. Transmitting on frequencies outside these ranges will require external bandpass filtering.
- Band 1: 75/80m - 3.5 ~ 4.0 MHz
- Band 2: 40m - 7.0 ~ 7.3 MHz
- Band 3: 20m - 14.0 ~ 14.350 MHz
- Band 4: 15m - 21.0 ~ 21.45 MHz
- Band 5: 10m - 28.0 ~ 29.7 MHz
Receiving sensitivity: better than 0.45uV,
Frequency stability: better than 0.5ppm
Frequency accuracy: better than 0.5ppm
Operating voltage: 12.0 ~ 14.0V DC
Receiver Standby Current: 0.5A
Included in the package:
- X1M Platinum Transceiver
- Power plug (owner must build their own cable)
- Keyer plug (owner must build their own cable)
- Audio Filter for CW or SSB - Variable Center Frequency and Bandwidth
- Computer Interface Connector Cable (TTL/RS232 to USB) - To Update Firmware & Operate X1M via Ham Radio Deluxe or other rig control or digimode suites.
Friday, January 10, 2014
The QRP Diaries #1 - Picking A Radio
I wish I could remember the trigger, the tiny thought that got me started down the road of buying a QRP radio. If I think back to last year it might have been the release of the Elecraft KX3.
The KX3 got a lot of press and was featured in every magazine. It is new and cool, it is small and feature rich. Elecraft is a great brand name. My only problems with the KX3 was the cost. By the time I filled the shopping cart with the radio and the essential accessories it was well over $1000 US and that's a level of investment that requires justifications and approvals within my household. My wife the 'Budget Master' would not be happy. I can't tell you how many time over the last 12 months I surfed to the Elecraft site and filled up the shopping cart and then eventually walked away without clicking the final Confirm Order button. and not becasue I didn't really really want too.
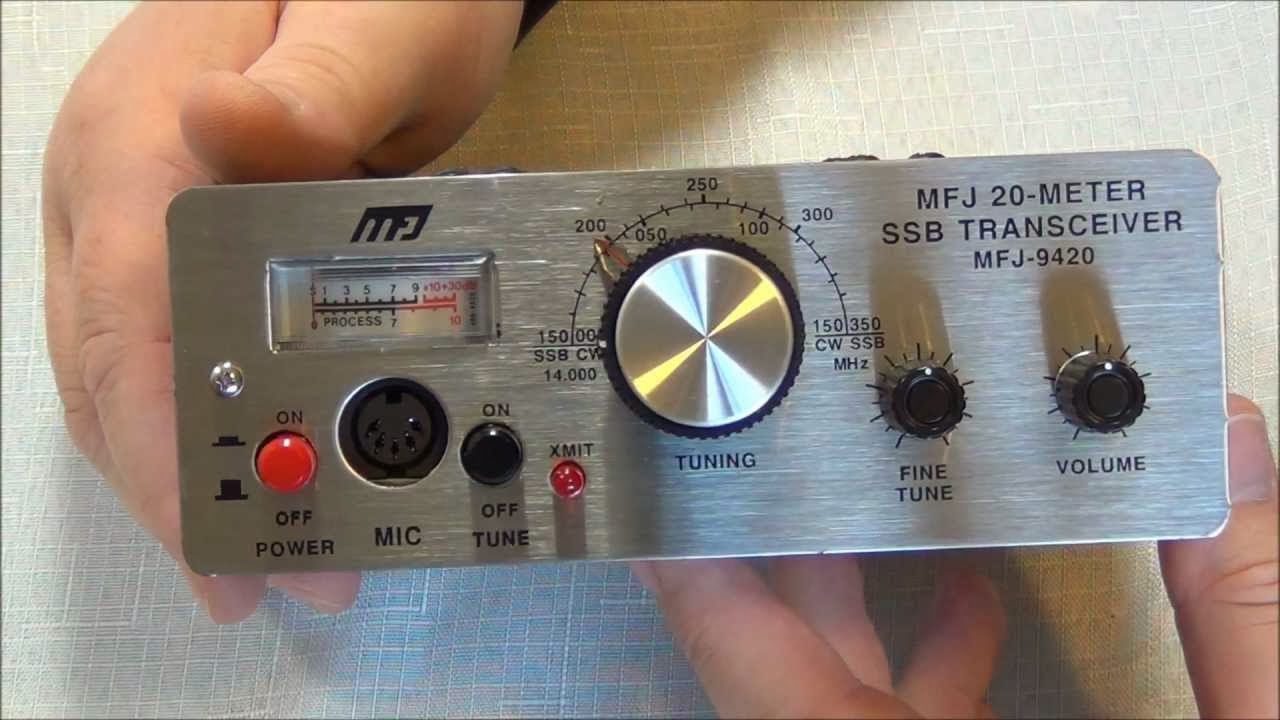
My next inspiration came 4-5 months ago when a local ham posted a Swap & Shop ad for a used MFG 9420 QRP radio. My first thought was maybe the 'Rolls Royce' KX3 was overshooting the mark and I should be looking at Honda's or Ford's instead? I've only been a licensed Ham since early 2012 so maybe I should broaden my knowledge and do some more research.
That's when I started a more extensive search for QRP radios of all makes, models, and types. I fairly quickly narrowed down to the feature set that would be most practical for me.
The Yaesu FT817 seems to be the main horse in the race. Priced at $750 CAD it's still pretty pricey for my budget but it covers the wish list very well. Nice 3rd party accessories also exist like autotuners, etc.
Somewhere along the way I stumbled onto blogs and webpages talking about the X1M from China. This was originally a kit radio and had an extremely active community of owners and builders. The price was half that of the FT-817 at $349 USD and the word on the web was a next generation (v3) model was due for release soon and it would be ready built and contain a shopping list of improvements over the original two versions. The new model was going to be called the X1M Platinum and it was due for import into North America in Nov/Dec 2013.
I started reading owners blogs and posts, and I joined the X1M owners Yahoo Group. I found the Yahoo Group to be incredibly active, with upwards of 30 posts and replies every single day. There were Elmers helping new owners, Engineers designing and sharing upgrades and modifications, and almost every conceivable Question and Answer that you could think of.
Eventually I settled on the X1M based on it's price, features, and the overall excitement from the community. I figure if your gonna stick your toe into the waters of QRP, you might as well know that others are already in the pool.
The timing was great since Christmas was just around the corner and with any luck I might be able to leverage some holiday gift money into a new purchase. I got so excited that this was gonna happen, I ordered the radio on the credit card 2-3 days before Christmas and crossed my fingers...
| Elecraft KX3 - QRP Transceiver. |
My next inspiration came 4-5 months ago when a local ham posted a Swap & Shop ad for a used MFG 9420 QRP radio. My first thought was maybe the 'Rolls Royce' KX3 was overshooting the mark and I should be looking at Honda's or Ford's instead? I've only been a licensed Ham since early 2012 so maybe I should broaden my knowledge and do some more research.
![]() |
| MFJ-9420 - QRP Transceiver |
- Multi-mode - SSB and CW. I don't know code yet, so SSB and Digital are the only modes I currently use. CW is something on my to-do list.
- Multi-band - Most or all of the HF bands would be the most useful to be.
- Rig Control - Even if it's a tiny netbook, laptop, or tablet. Logging, digital modes, and CAT control are tools I really enjoy having.
The Yaesu FT817 seems to be the main horse in the race. Priced at $750 CAD it's still pretty pricey for my budget but it covers the wish list very well. Nice 3rd party accessories also exist like autotuners, etc.
![]() |
| Yaesu FT-817 - QRP Transceiver |
Somewhere along the way I stumbled onto blogs and webpages talking about the X1M from China. This was originally a kit radio and had an extremely active community of owners and builders. The price was half that of the FT-817 at $349 USD and the word on the web was a next generation (v3) model was due for release soon and it would be ready built and contain a shopping list of improvements over the original two versions. The new model was going to be called the X1M Platinum and it was due for import into North America in Nov/Dec 2013.
![]() |
| Xiegu Technology X1M Platinum - QRP Transceiver |
I started reading owners blogs and posts, and I joined the X1M owners Yahoo Group. I found the Yahoo Group to be incredibly active, with upwards of 30 posts and replies every single day. There were Elmers helping new owners, Engineers designing and sharing upgrades and modifications, and almost every conceivable Question and Answer that you could think of.
Eventually I settled on the X1M based on it's price, features, and the overall excitement from the community. I figure if your gonna stick your toe into the waters of QRP, you might as well know that others are already in the pool.
The timing was great since Christmas was just around the corner and with any luck I might be able to leverage some holiday gift money into a new purchase. I got so excited that this was gonna happen, I ordered the radio on the credit card 2-3 days before Christmas and crossed my fingers...
Thursday, December 26, 2013
A New Years Resolution Completed (just in time)
| Ice Tube Clock Kit v1.1 |
In the fall of 2012 I ordered an electronics kit.
I heard about the kit from Leo Laporte of the TWiT network when he interviewed the sites founder Limor "Ladyada" Fried. She was a great guest and one of the kits they mentioned was a clock made from a retro Russian display tube! The site is Adafruit.com
Well it was earlier that same year that I become a licensed amateur radio operator and my interest in vacuum tubes and electronics was just beginning.
I had the best of intentions, this would be one of my winter projects. When I hadn't even taken the parts out of the box by Christmas it was suddenly one of my 2013 New Years resolutions that I would get it done by spring... NOT!
Well this morning (Dec 26th 2013) I woke with a grand ambition to do nothing. I have been at two family Christmas events in two days and now it was Boxing Day, also known around my house as Pajama Day! I wasn't gonna leave the house, I wasn't gonna exert myself, the only plans I had was for some TV and gaming, and relaxation. I started the morning with a couple relaxing cups of coffee, and I hopped online and spent all my Christmas gift money. Then I settled in for some video gaming until my buddy informed me that he was only gonna be available for an hour or so and then he was watching Hockey with his family for the rest of the day.
My wife and I watched a movie, and by 2:00 in the afternoon I was BORED. I went into the 'shack' and saw the old kit sitting on the shelf. I remembered New Years resolution, and I saw six days left on the calendar year. Suddenly, I did a quick inventory of tools and other required materials and I figured let's get at it. At best I might get it started and finish it sometime over the next week or so.
I took over the kitchen table and dragged a small tote full of tools upstairs. I had hoped the lighting at the table would be brighter, and the front windows might also let in some winter sunshine in.
The kit ended up being much smaller then I thought. And I mean smaller on ALL scales. The parts were smaller, the solder points were smaller, and the finished product was smaller. This meant I should have used a better light and a magnifying system of some kind, something I don't currently own.
Lucky for me I had one solder tip with a very very fine tip and I think it saved the day. The kit had no SMT parts, but it was a very tight board with very small thru-hole parts. The toughest might have been the 19 thin wires from the display tube threaded through tiny holes in a circle the size of a dime and spaced so tight together that the solder wanted to flow from one to the next. Squint, blink, breath, squint, blink, breath.
The instructions on the website were GREAT, lots of pictures, lots of warnings in places where other people frequently mess up. Having a tablet right in front of me with the step-by-step guide proved to be a handy tool.
Suddenly I lifted my head and 3+ hours had gone by. The kit was done and the clock was working perfectly. Wow that was fun, and obviously very focusing of my attention. I didn't get bored, I didn't get up and walk about, I was in a kit building trance.
Like I said, that was fun!
Now I have a cool new glowing clock on the desk in the Ham Shack. It's set to UTC, and it fit rights in.
Subscribe to:
Posts (Atom)


.jpg)
.jpg)
.jpg)
.jpg)