Monday, October 24, 2022


Monday, February 28, 2022
IARU Note On Radio Communications from Ukraine
https://www.iaru-r1.org/2022/note/
Feb 27, 2022 · HF · Tom, DF5JL

“Any radio amateur currently transmitting from Ukraine is risking his or her life. If you hear a Ukrainian station, do not broadcast its callsign, location or frequency — whether on the band, in a cluster or on social media. You may be putting lives at risk.”
Source: DARC HF Committee via facebook

Thursday, February 17, 2022
Annual RAC Renewal

Thank you! Your Radio Amateurs of Canada account has been updated.
Radio Amateurs of Canada
Thank You Aaren Jensen for renewing your RAC membership with the Radio Amateurs of Canada.
Your membership expires on: March 3, 2023
You can request a personalized membership wallet card at https://www.rac.ca/membership-card-request/.
If you wish to obtain email forwarding using your call_sign@rac.ca please contact the webmaster at https://www.rac.ca/webmaster/.
You can place online orders for RAC and ARES merchandise at https://www.cafepress.com/rac_radio.
In accordance with the new anti-spam laws please subscribe at https://www.rac.ca/rac-notifications/ to have your email address added to our mailing list.
If you have any trouble, please feel free to contact us.
Best Regards,
Radio Amateurs of Canada
Wednesday, January 19, 2022
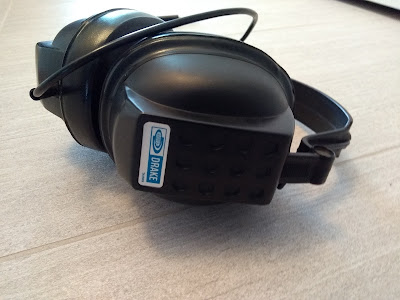
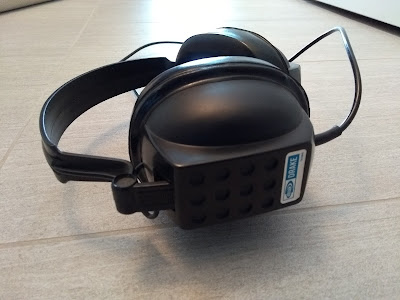
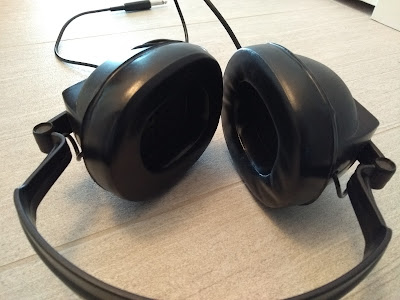
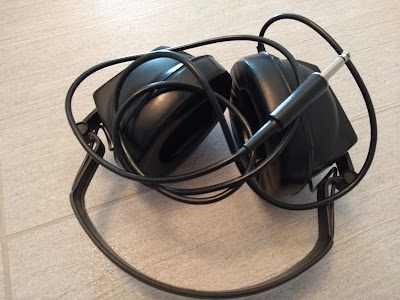
Drake UL68 Communications Headphones
Copied from https://www.universal-radio.com/used/sold688.html
The Drake Headphones are monaural and terminate to a 1/4 inch phone plug. There is nothing particularly noteworthy about these headphones other than the Drake logo on the left earpiece and right earpiece. Not stellar headphones, but a rare find for the Drake collector. [06/14]
I really enjoyed this short description/review. I guess I'll need to test them out for myself.
If anyone has any more technical information on these that would be greatly appreciated. I collect headphones and headsets for various purposes including Audiophile, Gaming, and Radio Communications.
With a mono 1/4 inch phone plug these are squarely in the Communications category, with Drake being an old amateur radio brand still popular with collectors.
Took me some time on the web to even find an actual model number (UL68), and it didn't help that a popular modern Canadian recording artist (Drake) dominated the search results about what headphones he personally uses when in the studio recording. Also strange that Beats by Dr. Dre also dominated the Drake Headphone searches since Drake the artist never sponsored any Beats headphones that I'm aware of?
Anyhow, another set of 'cans' for the wall.
Monday, August 16, 2021
North Okanagan Wildfire Scanner Feeds
Are you interested in monitoring the BC Forest Fire Service in the North Okanagan area, feel free to use these streaming links which do not require any radio equipment or the sharing of special or private frequencies.
The use of streaming links assures that radio interference does not occur from the general public monitoring. When using actual radio equipment the operator could improperly transmit on these critical channels if the radio is improperly programmed or the user is improperly trained on its use.
Streaming links also offer excellent audio quality as the radio receivers being used are located where the signal is strong and clear.

Web Browser Streams
Stream Title: North Okanagan Scanner
http://provoice.scanbc.com:8000/
Scroll down until you reach Mount Point /northok
Content Type: audio/mpeg
Stream Genre: Scanner
Social Media Stream URL: https://twitter.com/northokscanner
iOS and Android Apps
Browser your device app store for Police Scanner Radio & Fire
Download the free app. Listening for free can be done with the occasional interference for ads. You don't need to purchase the app subscription unless you wish to pay and go ad-free.
 |
| App appearance in the app store (iOS) |
 |
| App icon on your phone after installation (iOS) |
Once you have the app loaded and running search for North Okanagan RCMP Fire BCAS and SAR
You can mark the feed as a Favorite so it's easier and quicker to find it later.
Tuesday, July 06, 2021
Network Power Control for Remote HF Stations or Repeaters (Luxul PDU-02)


- Plug the provided 2ft. power cable into an AC power source. Any standard IEC PC power cord can be used if you need something longer.
- Plug the network into the ethernet port. Add the provided RF choke to the ethernet cable as close to the PDU as possible.
- Plugin the power cables for two devices (or a string of devices on power bars if you need more plugs).
- Get onto your network with a PC or laptop
- The PDU will pickup an IP address over DHCP. If the PDU 2 fails to find a DHCP server the unit will default to the IP address 192.168.0.6. You can use a network scanner to identify what IP it's using and plug that into your web browser to access the device's handy web interface.
- Individual IP outlet control of 2 outlets.
- 12 amp continuous load, 15 amp peaks.
- Easy setup and control
- IP “Autoping” and recovery for optimized system reliability
- MOV surge and spike protection
- Fast and easy configuration
- Automatic actions improve system reliability
- Automatic notification of connection status
- Control start-up or shut-down with remote sequencing
- Seamlessly interfaces with third-party control systems and cloud platforms for scheduling, control, reporting and customization
- 3-year limited warranty
- Connected equipment warranty
- Mounting kit included with a metal bracket for wall or flat surface mount.
- RF choke provided for ethernet cable
- Ground connector built-in.
- The unit shipped with the latest firmware 1.10.00
- Three account levels are built-in (admin, user, control system account).
- Accurate time from a network time source.
- Configure email alerts.


Saturday, June 26, 2021
Field Day 2021
Official Times
Field Day is always the fourth full weekend of June, beginning at 1800 UTC Saturday and running through 2059 UTC Sunday. Field Day 2021 is June 26-27.
Local Start (British Columbia, PST)
- 6:00 p.m. Saturday, Coordinated Universal Time (UTC) is
- 11:00 a.m. Saturday, in Lumby, BC
- 8:59 p.m. Sunday, Coordinated Universal Time (UTC) is
- 1:59 p.m. Saturday, in Lumby, BC
Tuesday, June 15, 2021
'Poor Hams' USB VFO Knob for PowerSDR & Legacy Flex SDR's

Don't get me wrong, the FlexControl from FlexRadio Systems is a fantastic VFO knob for your Flex SDR. But the price tag might scare some away, and people like me prefer to keep my FlexControl at home in the shack with my primary Flex SDR transceiver, away from the grit and grime of outdoor use.
But with my other Flex, I was looking for a smaller, lighter, cheaper USB VFO knob solution for outdoors & Field Day. Something that I wouldn't be as worried about losing or damaging. So, that's why I went down the rabbit hole of USB Volume knobs. Many of these are inexpensive but also hardwired to control volume and mute functions only on computers and tablets. I needed something programmable to mimic the mouse wheel or keyboard clicks that would adjust my VFO up and down and other functions like locking the VFO.
Thanks to RemoteTX.Net (https://remotetx.net/usb-vfo-knob-setup/), I found a solution for certain USB Volume knobs with a hidden programming feature. If it worked for their remote station solutions, maybe it would work for PowerSDR and my QRP Flex 1500?


When the knob arrived I attempted the hidden programming mode and was thrilled when it loaded as described. I won't try and replicate the fantastic instructions on the RemoteTX website, but I will go into detail about how the Flex PowerSDR configuration is different. Use the link above to get the really detailed step-by-step instructions from RemoteTX.net, then once you understand the process, you can read my notes on how I customized it for PowerSDR.
- First off don't plug the USB knob into your computer right away unless you want to test it for its volume control functions before programming it.
- Next, open the Notepad software on Windows and leave the Notepad window open and blank. Make sure the window is active (at the front of all other windows), in Windows jargon, this is called FOCUS, the app that you are interacting with.
- Hold the Knob button DOWN while you plug it into a USB port on the computer and then RELEASE the button after 1 second.
- Slowly after a few seconds, the text will appear in the Notepad window.
- DO NOT touch the mouse or keyboard from this point on, ONLY USE the knob and its button function and the lists and menus that it generates in your Notepad window. This is how to make all programming choices until the programming is completed.
- For PowerSDR I programmed the clockwise motion of the knob to increase the VFO by the PowerSDR increments set in the PowerSDR software. This uses the keyboard modifier of CTRL, and the key of the UP ARROW key.
- Next, I programmed the counter-clockwise motion of the knob to decrease the VFO by the PowerSDR increments set in the PowerSDR software. This uses the keyboard modifier of CTRL, and the key of the DOWN ARROW key.
- Then I programmed pressing the knob down (like a button) to lock/unlock the VFO frequency. This uses the keyboard modifier of CTRL and the key of the L key.
- There are 3 additional programming options that I modified to NONE for both the modifier and the key. I might change this in the future, but I don't want to make it more complicated especially when sharing my portable rig with others at events like Field Day. These extra modes were;
- Press+Clockwise Turn (maybe for mode change up?)
- Press+Counterclockwise Turn (maybe for mode change down?)
- Long Press (maybe for triggering the autotuner?)
- When you have the options that please you, one last step is clicking on SAVE & QUIT. After you get the OK! you should unplug the USB knob, wait a few seconds, plug it back in, and test your new programming with the PowerSDR software.


UPDATE
| Key Sequence | Function |
|---|---|
| space bar | TX/RX Toggle after MOX is on until you click on any other button of the GUI |
| - | AF gain decrease |
| + | AF gain increase |
| * | Mute Toggle |
| [ | XIT Up |
| ] | |
| , (comma) | |
| . (period) | |
| ; (semi colon) | |
| \ (back slash) | |
| A | Freq. Down 1 MHz* |
| B | Filter Up* |
| C | |
| D | Freq. Down 10 KHz* |
| E | Freq. Up 10 KHz* |
| F | Freq Down 1 KHz* |
| G | Freq Down 100 Hz* |
| H | Freq Down 10 Hz* |
| I | RIT Down* |
| J | Freq Down 1 Hz* |
| K | IF Shift Left |
| L | IF Shift Right |
| M | Band Change Up* |
| N | Band Change Down* |
| O | RIT Up* |
| P | XIT Down* |
| Q | Freq Up 1 MHz* |
| R | Freq Up 1 KHz* |
| S | Freq Down 100 KHz* |
| T | Freq Up 100 Hz* |
| U | Freq Up 1 Hz* |
| V | Filter Down* |
| W | Freq Up 100 KHz* |
| X | Mode Change Up* |
| Y | Freq Up 10 Hz* |
| Z | Mode Down* |
| ALT+A | |
| ALT+B | Toggle NB On/Off |
| ALT+C | CW Form |
| ALT+D | |
| ALT+E | |
| ALT+F | Filter Wider |
| ALT+G | Copy VFO A to VFO B |
| ALT+H | Copy VFO B to VFO A |
| ALT+I | IF Shift Reset (centered) |
| ALT+J | |
| ALT+K | |
| ALT+L | |
| ALT+M | Memory Form |
| ALT+N | Toggle NB2 On/Off |
| ALT+O | |
| ALT+P | |
| ALT+Q | CW Speed Up |
| ALT+R | RIT Zero |
| ALT+S | Setup Form |
| ALT+T | Toggle TUNE on/off |
| ALT+U | |
| ALT+V | Swap VFOs A/B |
| ALT+W | Wave From |
| ALT+X | XVTR Form |
| ALT+Y | XIT Zero Beat |
| ALT+Z | Zero Beat |
| F1 | CW Memory 1 |
| F2 | CW Memory 2 |
| F3 | CW Memory 3 |
| F4 | CW Memory 4 |
| F5 | CW Memory 5 |
| F6 | |
| F7 | |
| F8 | |
| F9 | |
| F10 | |
| F11 | |
| F12 | |
| CTRL+ "up arrow" | VFO A Increase freq. by tune step |
| CTRL+ "down arrow" | VFO A decrease freq. by tune step |
| CTRL+"-" | AGC-T Gain Down |
| CTRL+"+" | AGC-T Gain Up |
| CTRL+A | Toggle AGC on/off |
| CTRL+B | Toggle NR on/off |
| CTRL+C | Quick Save |
| CTRL+D | |
| CTRL+E | |
| CTRL+F | Filter Narrower |
| CTRL+G | |
| CTRL+H | |
| CTRL+I | |
| CTRL+J | |
| CTRL+K | |
| CTRL+L | Toggle VFO lock/unlock |
| CTRL+M | Toggle MOX on/off |
| CTRL+N | Toggle ANF on/off |
| CTRL+O | |
| CTRL+P | Preamp |
| CTRL+Q | |
| CTRL+R | |
| CTRL+S | Toggle Split on/off |
| CTRL+T | |
| CTRL+U | |
| CTRL+V | Quick recall |
| CTRL+W | CW Speed Down |
| CTRL+X | |
| CTRL+Y | |
| CTRL+Z | |
| CTRL+ALT+U | UCB configuration form |


Tuesday, February 16, 2021
Amateur Radio in Canada. What It Is, And What It Isn't.
The statements and comments in this post are the opinions of the writer. If I'm wrong on important details please correct me. If you have your own 'opinions' feel free to express them elsewhere, this is my blog hi hi.
So many repeated threads online related to the hobby. Sometimes I have the patience to answer the same questions over and over, and sometimes I wish people would search or scroll down and find the same questions answered over and over in the previous posts.
1) An Amateur Radio 'Certificate of Proficiency' is issued to a person by the Canadian Government department ISED (Innovation, Science and Economic Development Canada) formerly Industry Canada.
- Many Amateurs refer to this as a 'license' which technically it's not. I'm one of those people that doesn't mind the term license as it's easier to say and remember.
- An Amateur Radio 'Certificate of Proficiency' is issued when you pass the multiple-choice test with an Accredited Examiner. These examiners are volunteer Amateur Radio operators of a high knowledge level in the hobby who had been certified to run exams on behalf of ISED.
- Passing the Basic exam with a score of 70% or higher is a pass. You will be issued the Basic Certificate of Proficiency in Canadian amateur radio and a callsign. You will be allowed to operate radios in the 6M band and above (VHF, UHF, Microwave).
- Passing the Basic exam with a score of 80% or higher earns you the designation Basic with Honors. You will be issued the Basic with Honors Certificate of Proficiency in Canadian amateur radio and a callsign. This unlocks HF band privileges combined with 6m and above. So you can use ALL of the Canadian bands and frequencies allocated for amateur radio use.
- Once you have your Basic Certificate of Proficiency you can stop, or continue to study and take the Morse code add-on (5 WPM in CW plus exam), or take the Advanced test and try for your Advanced Certificate of Proficiency in Canadian amateur radio, which grants some additional benefits like building your own radios and operating and maintaining repeaters.
2) An Amateur Radio 'Certificate of Proficiency' DOES NOT allow you to operate in other radio-related modes and systems in Canada including;
- Marine radio (required to operate boats)
- Aeronautical radio (required to operate planes)
- Land Mobile radio (used commercially between work vehicles and office base)
- Rural Route radio (used on rural & logging roads to call out traffic locations)
3) I'm an avid offroader and I was told Amateur Radio is an excellent way to communicate off the beaten path and utilize mountain top repeaters where the cell phone is out of range.
- Yes, you can utilize amateur radio this way. You must follow the amateur radio rules and share the bands and frequencies with others. You cannot claim a frequency as your own, or tell others to get off your frequency.
- Keep in mind if it's multiple people in your party, and each has a radio in their vehicle or on their person they ALL need an Amateur Radio 'Certificate of Proficiency' to communicate with one another.
- You can't use your amateur radios for other purposes (like rural route radio communication on logging roads for example).
- There are alternatives to Amateur Radio for offroading. Look into https://vernoncommunications.ca/4wdabc-gets-bc-wide/
4) What does it cost to get an Amateur Radio 'Certificate of Proficiency'
- Typically it should cost $100. Radio clubs run courses that typically cost around $100. These will typically include the coursebook from Coax Publications with a value of $50 and will also include the classroom teaching and the final exam all together in that $100 bundle.
- There is free course material online on the internet, the quality of that material varies, where the Coax Publication coursebook works on being up to date to match the current government exam.
- If you chose to self-study you will need to find your own examiner and that might also include a small fee as examiners are allowed to charge for their expenses if they wish.
- If you research online well, you can find all the materials you need to study for free, you could also find an examiner for free, so potentially the cost could be nothing. More often people don't mind the $100 investment in getting classroom learning, a good book to keep and study from, and the convenience of an examiner-led scheduled exam at the end.
Sunday, January 10, 2021
Antenna SWR Chart
 |
| Click on chart image for a larger view |
Spent some time in the shack this weekend moving cabling around and inserting the new LDG auto tuner in the previous blog post.
Whenever I make changes like this I like to test everything on the antenna analyzer to make sure the SWR doesn't change and also refresh my memory on which HF antenna provides the best SWR on each band.
As part of the process, this new chart was made and will be printed and placed at eye-level from my main operating position.
Key information presented in the chart;
- Tuner input by name
- Antenna assignment in the tuner
- Antenna by name
- All HF bands that are workable on either antenna.
- All SWR levels from the approximate center of each band,
- Color coding, green for SWR of 1 to 3. yellow for SWR of 3 - 5, orange for SWR of 5 - 10
- In the blue cells, I identify the bottom and top frequencies for each band.
- And finally, the grey cells identify the center band frequencies that I use when testing the SWR on each antenna with the antenna analyzer.
Wednesday, January 06, 2021
New Year & New Wiring Configuration

With a new year comes a new purchase and a re-wire of the shack.
The new purchase is an LDG AT-200ProII antenna tuner. Some nice features of this unit include two antenna inputs and a 200-watt max power handling with SSB and CW signals on most bands. Another great feature is the versatility of this model line from LDG allowing them to work with almost any transceiver instead of some of their other models that are designed to pair with a specific model of transceiver (for example my Yaesu FT-847 transceiver and it's matching LDG YT-847 auto tuner).
The new wiring layout suits my operating style, one operator using one radio at a time. It will allow me to have up to 4 of my HF transceivers wired into a grounded antenna switch. I can select one radio at a time to operate on. Typically the other radios are turned off when not in use.
After deciding the radio to operate with, and switching to that radio on the switch, my signal will pass onto a nice large display HF SWR Meter (Daiwa - CN-801HP) before passing into the new auto tuner (LDG AT-200ProII). In the tuner, I can select either one of my HF antennas (dipole or beam) to transmit & receive on. Each antenna has a high-quality lightning arrestor installed and proper grounding of all the equipment and antennas (safety ground, lightning ground, & rf ground).
I know this isn't rocket science and I'm not inventing something new here. For my solo operating style this is just a new versatile configuration that supports all of the following;
- Four (4) transceivers wired in and available for use (always just one at a time).
- A manual switch that also supports a straight to ground position when no equipment is being used.
- An investment in a nice big & well lit SWR Meter that works with any radio selected in the configuration.
- An investment in a nice Auto Tuner that works with any radio selected in the configuration.
- Two HF antenna choices that can be easily selected on the Auto Tuner.


Wednesday, July 15, 2020
'Poor Hams' GeoChron Amateur Radio Information Display


- Operators callsign (with control of color scheme for alphanumeric text and background)
- Internet synced UTC clock with hours, minutes and seconds as well as DST on/off
- Day, month, year
- Stopwatch or remaining time countdown
- Screen lock so preferred setting are not changed by accident
- Mercator or Azimuthal map view with grayline
- Toggle Lat/Long map grid, or Tropics, or none.
- Moon phases as seen from the earth surface.
- Sun position directly overheard.
- OACAP predictions for any path at several power levels
- trend plots and predictions for solar flux, sunspot, XRay and Kp index
- short and long path antenna beam heading and distance to any DX location
- Satellite and ISS tracking and display next satellite rise/set times and overhead pass (not just global track)
- local weather, time, grid square, prefix and sun rise/set times at any DX location
- live scrolling DX cluster display
- live solar images from Solar Dynamics Observatory
- live NCDXF beacon location, time and frequency schedule
- live RSS feeds from popular ham related web sites
- show Moon rise/set and overhead passes for EME
- adjust time forward or back to explore gray line location, satellite orbits etc
- and these are just a few...
Ham Clock DIY
 |
| VA7AEJ's Ham Clock 32" LCD TV Project |
My parts list
- An older small form factor Acer desktop computer with HDMI output. A PC with any output graphics that support your monitor or TV would work.
- An older 32" Sony Bravia LCD TV that's already mounted on the wall in my shack for watching TV.
- USB Flash Drive (4GB)
Software
- Linux Lite 5.0, a lightweight linux distro built for older computers and based on Ubuntu Linux.
- You may use actual Ubuntu, or any other flavor of Linux based on Ubuntu should work.
- Ham Clock ver 2.49 (current version as of July 2020) downloaded and compiled during the setup steps below.
Setup Steps
- From another PC download the ISO image of the latest version of Linux Lite.
- Using tools like 'Balena Etcher' or 'Rufus' flash the downloaded linux ISO to a USB flash drive creating bootable installation media for the PC. You may also burn the image to a DVD if you prefer that method and your intended target PC has a DVD drive.
- I booted the target PC (my old Acer) from the USB flash drive and installed Linux Lite.
- All the installation setup screens are common sense and the default options were chosen most of the time.
- On the partition screen, I said to wipe the drive and replace the contents with Linux Lite.
- On the user/password screen, I set the account to log in automatically for convenience.
- At the end of the Linux Lite installation, I shut down the system and removed the USB flash drive (or DVD) and then powered on the system on the newly installed Linux Lite.
- Once the system is booted I went straight to the Terminal program and the command line. Cut and paste these commands into the Terminal session and run each line on it's own before advancing to the next line. For example in the first line select the text sudo apt-get update
- Scan for system updates sudo apt-get update
- Install all updates found sudo apt-get upgrade
- Add some required software sudo apt install curl make g++ xorg-dev
- Reboot the system and then resume in Terminal again.
- Download Ham Clock curl -o ESPHamClock.zip http://www.clearskyinstitute.com/ham/HamClock/ESPHamClock.zip
- Unpack the Ham Clock download unzip ESPHamClock.zip
- Change to the new Ham Clock directory cd ESPHamClock
- Compile the Ham Clock program make -j 4 hamclock-1600x960
- NOTE: Ham Clock supports only four screen sizes so pick the one that's under the max resolution of your monitor or TV attached to the Ham Clock PC.
- Ham Clock resolutions - 800 x 480 - 1600 x 960 - 2400 x 1440 - 3200 x 1920
- My TV's max resolution is 1920 x 1080, so I compiled the software at 1600x960 as both the width and height of HamClock is less than the height and width of the TV's resolution. If you pick higher Ham Clock settings the program will be larger than the monitor and areas will not be seen on the screen.
- Create a desktop shortcut for launching Ham Clock
- Right-click on an empty area of the Linux Lite desktop and select Create Launcher
- Name: Ham Clock
- Comment:
- Command: ./hamclock-1600x960
- Working Directory: /home/[your-username]/ESPHamClock
- Icon: select something you like from the available options

Tuesday, July 07, 2020
Brian Jensen Obituary

Brian Jensen of Trinity Valley, Lumby passed away suddenly on the evening of Thursday, June 11th on the property that he developed and loved over a period of 40 years. He is survived by his wife of 52 years Ursula, his son Aaren Jensen (Kelly) and granddaughter Molly of Lumby, and daughter Vanessa O’Brien (Rick) of Kamloops. He leaves behind his sisters Karen (Dave) Kovak of Saskatchewan, and Bonnie (Kim) Jensen of Alberta as well as a large extended family throughout BC, Alberta, and Saskatchewan.
Brian was born in Camrose Alberta the only son of the late Harold and Carol Jensen a farming family from the Ferintosh region. He attended Camrose Lutheran College before moving to work at Alberta Hospital Ponoka. While in Ponoka he met his future wife Ursula Graumann, a recent immigrant from Essen Germany. Brian became interested in a mental health career and became a Registered Psychiatric Nurse (RPN). He married Ursula and moved his young family to Drumheller AB to work at a new Federal Penitentiary. As his family grew Brian shifted from nursing into Manpower & Immigration, then recruiting helping find Engineers from England and Scotland to work in the northern Alberta oil industry. At the start of the 1980s while working in Edmonton Brian and his family made a huge decision to leave their corporate jobs and city lives and try their hand at homesteading in Trinity Valley north of Lumby. They settled on an empty 20-acre parcel with a spectacular view. Brian and Ursula with help from their children built a beautiful log home. Brian taught himself every step of construction requiring little outside help. After a few years, he went back to nursing at the Vernon Jubilee Hospital in various roles related to Psychiatry and mental health. He helped many people in the North Okanagan as his career transitioned from nursing into mental health therapy until his retirement.
Back on the farm with no prior horse experience Brian and Ursula bought a couple Norwegian Fjord Horses which slowly grew to become a major part of their lives for the next 35+ years. Brian was extremely active in the Breed, raising horses, importing and selling, showing, driving & competitions, training, teaching, and judging. He was an internationally certified judge and evaluator traveling throughout North America and Europe working for the breed he loved. He traveled to Norway many times representing Canada and the USA as a member of the International Fjord Horse board. Most importantly he mentored and trained hundreds of other people and families to love the Fjord horse as much as he did.
As hard-working and respected as Brian was in his work and personal life, he privately had his own mental health issues. As he approached his 75th birthday he found it more and more difficult to adjust to aging, declining health, and reducing his activities within the Fjord community. If you are struggling with mental health issues PLEASE reach out for help. In the North Okanagan contact the Canadian Mental Health Association, The Vernon Jubilee Hospital, or the People In Need (PIN) Crisis Line at 1-800-353-2273.


